Reminder/Recall
Reminder/Recall allows providers to notify patients about upcoming or past due vaccinations. Only the patients you own and the patients who are in your specific Organization (IRMS), Facility, or Facility Group are included in the Reminder/Recall results.
The Reminder/Recall menu provides the following links to authorized users with the correct permissions:
- Reminder/Recall - Used when you want to notify patients about upcoming or past due vaccinations.
- Run Templates - Used to run reminder/recalls using previously created templates that define patient search criteria and contact methods. See Run Templates.
- Create Templates - Used to create, edit, schedule, and run new templates. See Create Templates.
- Manage Cohort - Used to search, view, and inactivate/activate the saved reminder/recall groups, known as cohorts. See Manage Cohort.
To begin, click Reminder/Recall > Reminder/Recall from the menu.
Notifications can be generated in the following formats:
- Generate a Patient List - Generates an HTML file that displays a detailed list of patients, including their vaccination forecast.
- Print Letters - Generates a reminder/recall letter for each patient in the patient list.
- Generate Auto-Dialer Content - Generates an HTML file that can be used with any external auto-dialer application.
- Generate Mail-Merge - Generates a text file that can be used with any external mail merge application.
- Create Custom Post Cards - Provides the ability to create custom postcards as reminder/recall notifications. You can define the dimensions of the postcard, as well as the message content.
- Send Email - Provides the ability to send reminder/recall notifications using patient email addresses.
In addition to sending notifications, you can also print address labels and/or save selected patients as a patient group, or cohort.
The following frequently asked questions also provide an overview to the reminder/recall feature:
When do I want to use reminder/recall?
Depending on your clinic's size, you may want to run this once a week or once a month to notify your patients of upcoming or past due vaccinations. It may also be useful to use this feature when you have a vaccine that is about to expire. In this case, you can limit the parameters to the specific vaccine and notify patients to come in for their upcoming vaccination. This can help to decrease wastage and ensure your patients are up-to-date with their vaccines.
Who can use reminder/recall?
Organization (IRMS) Client, Registry Client, and Facility Client users can use reminder/recall with one of these two permissions:
- Run Reminder/Recall - Provides the Reminder/Recall and Run Templates features.
 Â If the Enable Global Search option is enabled (selected), Facility Client and Organization (IRMS) Client users can use the Registry Client user's saved searches on the Run Templates page if the Organization (IRMS) and Facility match. For example, the Organization Client (IRMS) user can use Global, Organization (IRMS) and Facility Client templates. The Facility Client user can use Global and Facility templates.
 If the Enable Global Search option is enabled (selected), Facility Client and Organization (IRMS) Client users can use the Registry Client user's saved searches on the Run Templates page if the Organization (IRMS) and Facility match. For example, the Organization Client (IRMS) user can use Global, Organization (IRMS) and Facility Client templates. The Facility Client user can use Global and Facility templates. - Manage Reminder/Recall - Provides the Reminder/Recall, Run Templates, Create Templates and Manage Cohort features.
Are there other options associated with reminder/recall?
Yes. If you have the permission Manage Reminder/Recall, you can also use the Run Templates, Create Templates, and Manage Cohort features. Authorized users can also set a patient status to Inactive for their owning organization/facility, or Deceased (if applicable).
How can I evaluate the success of my reminder/recall efforts?
The Reminder/Recall Success Report produces data measures that show how many patients were sent a reminder/recall notification and what percentage of those patients came to the provider for a vaccination within a 30, 60, and 90-day period. This is considered the success rate and is based on updates to patient vaccination records in the system. If a patient received a vaccine they were reminded to come in for within a 30, 60 or 90-day period, the reminder/recall notification is counted as a success and becomes part of the numerator of the calculation.
Notes about Patient Active/Inactive Status and Ownership Versus Service:
The ownership (For all patients you own) and service (For all patients you have seen at your facility) filters work along with the patient status filter (Include Inactive Patients (Excluding deceased)) to determine which patients are displayed in the results. Use the guidelines below to produce the results that best meet your needs:
- For all patients currently owned by your organization/facility (Active): Select For all patients you own, but do not select Include Inactive Patients (Excluding deceased)
- For all patients ever owned by your organization/facility: Select For all patients you own and Include Inactive Patients (Excluding deceased)
- For all current patients (Active) that have received service from your organization/facility: Select For all patients you have seen at your facility, but do not select Include Inactive Patients (Excluding deceased). Note that patients who have received a more recent vaccination from a different organization/facility (that does not have the Automatic Ownership Blocked option enabled) will not appear in the results
- For all patients that have ever received service from your organization/facility: Select For all patients you have seen at your facility and Include Inactive Patients (Excluding deceased)
For more information about Patient Active/Inactive Status (PAIS) and how it works in IWeb, see Notes about IWeb and SMaRT AFIX in the IWeb Administrator User Guide.
Reminder/Recall Workflow
Using reminder/recall is simple:
- Select options for the type of patient recall list you want. See Step 1: Reminder/Recall Parameter Page.
- Review and edit the resultant patient recall list. See Step 2: Review the Patient Reminder/Recall List.
- Select an action on what to do with the patient recall list. See Step 3: Select an Action for the Patient List.
Each step can be tracked with the tracking bar at the top of each page.
In addition to using the tracking bar to follow your progress as you complete each step, you can navigate to a previously completed step by clicking the number in the tracking bar when it is highlighted.
You can also navigate forward as long as the current step has been completed as part of the same workflow session. Changes made in a step are retained during the navigation from one step to another.
Step 1: Reminder/Recall Parameter Page
The Reminder/Recall parameter page is the first step in using the Reminder/Recall tool and provides options for selecting the list of patients for the recall list. To get to this page, click Reminder/Recall > Reminder/Recall on the menu.
There are two view types for the Reminder/Recall parameter page:
- Simple View (default) - Displays the most commonly used parameters. Use this view to produce a broader patient recall list.
- Advanced View - Click the Advanced button in the Who do you want to contact? section. Displays more detailed search options. Use this view to narrow the search results for a more specific patient recall list.
 Hover the mouse pointer over a question mark icon or a field name to see a more detailed description of the field. Hover the mouse pointer over a question mark icon or a field name to see a more detailed description of the field. |
To begin the reminder/recall process, select from the options on this page. When finished with the page, click one of the available buttons:
- Clear - Erase all selections made on this page.
- Schedule - Queue the reminder/recall for scheduling to run at a later time. The user must have the Scheduling/UFM permission. See Run Templates for more information about scheduling.
- Generate Patient List - Generate the list of patients that meet the criteria defined on this page.
The available criteria options on this page are as follows:
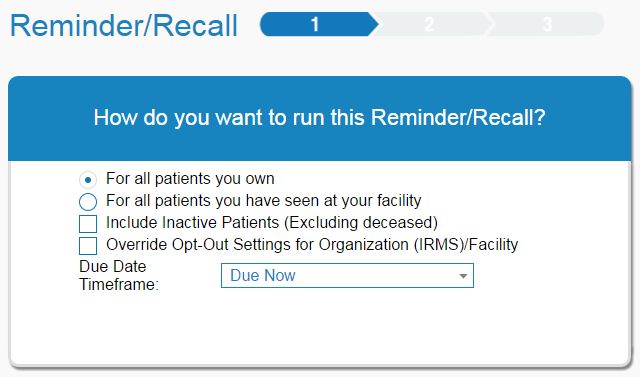
How do you want to run this Reminder/Recall?
| Field | Description | |
|
For all patients you own |
A patient is considered to be under your ownership if you are their normal primary care provider or if this is the last place where they have received a recorded vaccine. See the notes above. |
|
|
For all patients you have seen at your facility |
This pulls all of the patients to whom your practice has administered a vaccine to, regardless if they are currently owned by a different primary care provider. See the notes above. |
|
|
Include Inactive Patients (Excluding Deceased) |
If selected, patients flagged as inactive are included in the generated patient list, except for patients marked as deceased. If not selected, inactive patients are not included. See the notes above. |
|
|
Override Opt-Out Settings for Organization (IRMS)/Facility |
Select this option to override the opt-out settings and include in the list patients who have opted out reminder activities. |
|
|
Due Date Timeframe |
Determines which patients to include based on the Recommended Date column on the forecast. Non-custom dates have no earliest date constraints. The upper constraint (latest date) is as follows:
|
Who do you want to Contact?
| Field | Description | |
|
Patient Location |
Filter patients by location:
|
|
|
Patient Age Range |
Only one of these two options can be selected. Patient Age Range is the default. For Patient Age Range, enter the number of Days, Months or Years (and select which one from the drop-down lists) for the starting and ending age range. Patients whose ages are within the range are retrieved and included in the patient reminder/recall list. Note that you cannot enter a number that is zero or less. To retrieve patients of one specific age, enter the desired age in the From field and then the next number after that in the Through field. For example, to retrieve a list of patients who are 13 years old, enter 13 in the From field and 14 in the Through field, and select Years in the drop-drop lists. For Patient Birth Date, enter the starting birthdate in the From field and the ending birthdate in the Through field. Only patients whose birthdates are within this range are retrieved and included in the patient reminder/recall list. To retrieve a list of patients born on one specific date, enter the date in both the From and Through fields. |
|
|
Patient Gender |
Select one or more gender options using the drop-down list. List entries vary depending on the configuration settings. |
|
|
Exclude patients who were sent a notice in the last ... |
To exclude patients who were sent a reminder/recall notification in a specific timeframe, enter a number and then select Days, Weeks, Months, or Years from the drop-down list. |
Who do you want to Contact? - Advanced View Options (normally used by state administrators to implement a state-wide reminder/recall). Use the Advanced button to show and hide the advanced options.
| Field | Description |
|
Physician |
To generate a patient reminder/recall list based on one specific physician, select the physician from the drop-down list. Only one physician can be selected. The list of physicians populates from the provider list in the provider agreement from the selected Organization (IRMS) or Facility. This field also appears for the First Responder application. |
|
Health Plan |
This is a state-configurable option. Select a health plan from the drop-down list to generate a patient reminder/recall list based on one specific health plan. The list of health plans populates from the Health Plans Define Lookup. |
|
Facility Type |
This field only displays for Registry Client users. Select a facility type from the drop-down list. Only active facility types are included in the list. If a patient has an Organization (IRMS) but not a Facility, the facility type parameter excludes patients without facilities. The reminder/recall output is limited by the selected facility type. Examples:
|
|
Association |
This is a state-configurable option. To generate a patient reminder/recall list for a specific association (such as Tribal Corp.), select it from the drop-down list. The list of associations populates from the Associations Define Lookup. |
|
Program |
This is a state-configurable option. To generate a patient reminder/recall list for a specific program, select the program from the drop-down list. The list of programs populates from the Programs Define Lookup. |
|
High Risk Category |
This is a state-configurable option. Select a specific high-risk category from the drop-down list. The list of high risk categories populates from the High Risk Categories Define Lookup. |
|
State |
To generate a patient reminder/recall list for a specific state, select the state from the drop-down list. The state must be selected before a county /parish /borough/census area can be selected. Registry Client, Organization (IRMS) Client, and Facility Client users can use zip code, state, and county filters to limit recalls. This field also appears for the First Responder application. |
|
County / Parish / Borough / Census Area |
To generate a patient reminder/recall list for a specific county /parish /borough/census area , select it from the drop-down list. A state must be selected first. Registry Client, Organization (IRMS) Client, and Facility Client users can use zip code, state, and county filters to limit recalls. This field also appears for the First Responder application. |
|
Health District/Region |
To generate a patient reminder/recall list from a specific district or region, select it from the drop-down list. This field also appears for the First Responder Application. |
|
Zip Code |
To generate a patient reminder/recall list for a specific zip code, enter the zip code in the textbox. Registry Client, Organization (IRMS) Client, and Facility Client users can use zip code, state, and county filters to limit recalls. This field also appears for the First Responder application. |
|
Appointment Date |
To generate a patient reminder/recall list for a specific appointment date range, enter the From and Through dates in MM/DD/YYYY format. Note that the appointment date must be on the patient's demographic record (Next Appt. Date) in order to be retrieved. This field also appears for the First Responder application. |
|
Deferred Vaccinations Only |
To generate a patient reminder/recall list only for patients flagged with Deferred Vaccinations, select this option. |
|
Compromised Vaccinations |
To generate a patient reminder/recall list for patients who may have received compromised vaccinations, enter the suspected vaccination dates in the From and Through fields, or enter the lot number for the compromised vaccine in that field. |
|
Do Not Include Confidential Vaccinations |
This field only displays when the Administration > Settings > Properties > Vaccination Settings > Enable Enter Confidential Vaccines option is enabled (selected). Select this option to exclude adolescents receiving Hep B and HPV vaccinations from the reminder/recall list. |
Which vaccines would you like to include?
| Field | Description |
|
Select a series |
Select a vaccine series from the drop-down menu. The list of vaccine series populates from the Coverage Rate Report Series Define Lookup. A list of vaccines that make up the series appears in the box below the drop-down menu. |
|
I only want to see my patients who are ... |
Select a vaccination status for patients that applies to the selected vaccines:
 |
Step 2: Review the Patient Reminder/Recall List
Clicking Generate Patient List takes you to the second step, reviewing the list of patients. The page displays the list of patients who meet the criteria selected on the parameter page. To see more information about a specific patient, hover the mouse pointer of the patient's name. Click the printer icon on the pop-up window to print the patient information.
The patient list can be sorted by clicking a column header. Removed patients appear grayed-out in the list.
To review the reminder/recall criteria you used for the patient search, see that section at the bottom of the page (under the action buttons).
To export the list of patients, click Export Patient List and follow the prompts.
When finished with the patient list, click Submit to save the changes. The next page is where you can select an action to use with the list.
The available fields and options on this second reminder/recall page include:
| Field/Option | Description | |
|
Remove patients who don't have an available |
Remove patients that don't have available contact methods by selecting the contact types:
This feature allows you to remove patients who do not have one or more contact methods listed in their record on the Patient Demographic page (see Patients). If the patient does not have this information in their record, Reminder/Recall considers the information unavailable, with the exception of address. Reminder/Recall looks at the Valid checkbox for the address. If the Valid checkbox is not selected for the address, the address is considered invalid and unavailable as a contact method for the patient. |
|
|
Remove patients who have received more than ____ notifications |
To remove patients from the list who have received one or more previous notifications, select the number of past notifications from the drop-down list (1-20). |
|
|
(select checkbox) |
Selected patients are the patients that are included in the reminder/recall. To remove a patient from the list, remove the checkmark (click the checkbox). To re-add a patient to the list, click the checkbox (after which a checkmark appears). Select all patients to remove or re-add to the list by clicking on the checkbox in the header row. |
|
|
Last |
The patient's last name. |
|
|
First |
The patient's first name. |
|
|
Age |
The patients age at the time the list was run (i.e., today). |
|
|
Vaccines Due |
The number of vaccines due. |
|
|
Available Contact Methods |
Available contact methods (icons) for each patient are displayed in blue and a Valid message appears when you hover the mouse over the icon; contact methods that are not available appear grayed-out. |
|
|
R/R Attempts |
The number of previous reminder/recall attempts. |
|
|
Reason for Inactivation |
To remove a patient from the reminder/recalls, select a reason for inactivation from the drop-down list. Removed patients appear grayed-out in the list. Note that if Deceased is selected as a reason for inactivation, the patient status is set to Deceased for all providers. Make sure a patient is confirmed as deceased before selecting this option. If a Reason for Inactivation is selected, the patient is removed from the list. After Submit is clicked, the patient's status on the Patient Demographic page is changed to Inactive with the selected reason and they are removed from the Organization's or Facility's ownership. Reasons for Inactivation are populated from the Inactive Reason to Indicate Inactive Status Define Lookup.
|
|
|
Previous/Next Arrows |
The Showing # to # of # entries statement shows if additional pages of the list are available. Click the Next and Previous arrow buttons to move from page to page in the list. |
Step 3: Select an Action for the Patient List
After you click Submit on the patient list page, the action page opens. At the top of the page are icons with numbers next to them, showing how many total patients are included, along with how many mailing addresses, telephone numbers, cell phone numbers, and email addresses are available for the list of patients. Hover the mouse pointer over the icons to see the details.
The following actions can be performed on this page.
Generate a Patient List
This action generates an HTML file that displays a detailed list of your patients, including their vaccination forecast.
To begin, click the Generate a Patient List icon. A pop-up window opens, containing more details about the content of the generated patient list. From this window, you can:
- Make this count toward the number of recall attempts - Select this option if you want the reminder/recall notification generated here to count toward their total number of reminder/recall attempts.
- Save as Template - Click this button to save the reminder/recall parameters set on the first page of this session, the patient list, and the action selection as a template that can be used again.
- Run - Click this button to generate the patient list. The list appears in a separate browser window and contains more detailed information about each patient in the list, including their vaccination forecast and the list of vaccines they are due for based on what was selected on the parameter page. Use the browser's print function to print this page.
To close the pop-up window, click the X in the upper right-hand corner.
Print Letters
This action generates a reminder/recall letter for each patient on the patient list.
To begin, click the Print Letters icon. A pop-up window opens with two tabs Message (default) and Instructions. On the Message tab, you can select whether to use the default message or create a new message. You can also select which language to use (English, Spanish, or Patient Preferred).
These are the fields available on the Message tab:
| Field | Description |
|
Facility Return Address Information |
Enter the Facility's name, phone number, street address, and city, state and zip code information in the four textboxes. This information appears in each letter. |
|
Preview Letter Message |
Select Default or User Defined from the drop-down list. The default message is pre-defined and cannot be edited. |
|
Output Language |
Select English, Spanish, or Patient Preferred from the drop-down list. If you select a language, you need to enter a user-defined message in that language in order for it to display properly in the notification. Language selection is tied to the language selected on the Patient Demographic page. Patients receive messages in the language selected if the language in their record is set to the same one. The system default message only displays in English. All other language outputs display in the user-defined message. The languages listed in the drop-down list are configured in the Language Type Define Lookup. |
|
(message textbox) |
If User Defined was selected for the Preview Letter Message, enter the message in the textbox. |
After entering the message information, you can:
- Make this count toward the number of recall attempts - Select this option if you want the reminder/recall notification generated here to count toward their total number of reminder/recall attempts.
- Save as Template - Click this button to save the reminder/recall parameters set on the first page of this session, the patient list, and the action selection as a template that can be used again.
- Run - Click this button to generate the letters. The letters appear in a separate browser window, listed one right after the other, but when sent to the printer using the browser's print function, they print one letter per page (standard 8.5" x 11" letter size). You may need to turn off the headers and footers in the print preview so that they do not appear in the printed letters. Custom messages are saved to the user's account, so that a previously entered message auto-populates in the message textbox the next time the user uses Reminder/Recall.
To close the pop-up window, click the X in the upper right-hand corner.
Generate Auto-Dialer Content
This action generates an HTML file that can be used with any external auto-dialer application.
To begin, click the Generate Auto-Dialer Content icon. A pop-up window opens with instructions. From this window, you can:
- Make this count toward the number of recall attempts - Select this option if you want the reminder/recall notification generated here to count toward their total number of reminder/recall attempts.
- Save as Template - Click this button to save the reminder/recall parameters set on the first page of this session, the patient list, and the action selection as a template that can be used again.
- Run - Click this button to generate the auto-dialer content. The information opens in a new browser window. Right-click within the text area on that new page, click Select All, and copy the information to a text file.
To close the pop-up window, click the X in the upper right-hand corner.
Generate Mail-Merge
This action generates a text file that can be used with any external mail-merge application.
To begin, click the Generate Mail-Merge icon. From this window, you can:
- Make this count toward the number of recall attempts - Select this option if you want the reminder/recall notification generated here to count toward their total number of reminder/recall attempts.
- Save as Template - Click this button to save the reminder/recall parameters set on the first page of this session, the patient list, and the action selection as a template that can be used again.
- Run - Click this button to generate the mail-merge content. The information downloads as a Mail_Merge.txt text file, which can be used with a mail-merge application.
To close the pop-up window, click the X in the upper right-hand corner.
Create Avery 8387 Postcards
This action generates a reminder/recall postcard for each patient on the patient list, which can be printed on Avery 8387 postcards. You can define the dimensions of the postcard and the message content.
To begin, click the Create Avery 8387 Postcards icon. A pop-up window opens with two tabs Message (default) and Instructions. On the Message tab, you can select whether to use the default message or create a new message. You can also select which language to use (English, Spanish, or Patient Preferred).
These are the fields available on the Message tab:
| Field | Description |
|
Facility Return Address Information |
Enter the Facility's name, phone number, street address, and city, state and zip code information in the four textboxes. This information appears in each letter. |
|
(preview postcard message) |
Select Default or User Defined from the drop-down list. The default message is pre-defined and cannot be edited. |
|
Output Language |
Select English, Spanish, or Patient Preferred from the drop-down list. If you select a language, you need to enter a user-defined message in that language in order for it to display properly in the notification. Language selection is tied to the language selected on the Patient Demographic page. Patients receive messages in the language selected if the language in their record is set to the same one. The system default message only displays in English. All other language outputs display in the user-defined message. The languages listed in the drop-down list are configured in the Language Type Define Lookup. |
|
(message textbox) |
If User Defined was selected for the postcard message, enter the message in the textbox. |
After entering the message information, you can:
- Make this count toward the number of recall attempts - Select this option if you want the reminder/recall notification generated here to count toward their total number of reminder/recall attempts.
- Save as Template - Click this button to save the reminder/recall parameters set on the first page of this session, the patient list, and the action selection as a template that can be used again.
- Run - Click this button to generate the postcards (after following the printer setup instructions on the pop-up window's Instructions tab). The postcards appear in a separate browser window, listed together, but when sent to the printer using the browser's print function, they print one message per postcard. You may need to turn off the headers and footers in the print preview so that they do not appear in the printed letters. Custom messages are saved to the user's account, so that a previously entered message auto-populates in the message textbox the next time the user uses Reminder/Recall.
To close the pop-up window, click the X in the upper right-hand corner.
Print Labels
This action generates a PDF file that can be printed on Avery 5160 labels or similar.
To begin, click the Print Labels icon. A pop-up window opens with instructions. From this window, you can:
- Make this count toward the number of recall attempts - Select this option if you want the reminder/recall notification generated here to count toward their total number of reminder/recall attempts.
- Save as Template - Click this button to save the reminder/recall parameters set on the first page of this session, the patient list, and the action selection as a template that can be used again.
- Run - Click this button to generate the PDF page of labels. (For patients over 18 years of age, labels are addressed to the patient. For patients under age 18, labels are address to the parents.) Use the browser's print function to print the labels (after inserting the correct label paper into the printer). You may need to turn off the headers and footers in the print preview so that they do not appear on the printed labels page.
To close the pop-up window, click the X in the upper right-hand corner.
Save as a Patient Group (Cohort)
This action saves your final patient reminder/recall list as a patient group (cohort) that you can use again for reminder/recall notifications. If the patient list represents a specific service population that you intend to send notifications to on a regular basis, saving the list as a cohort can save time and effort. See Manage Cohorts for more information.
To begin, click the Save as a Patient Group (Cohort) icon. A pop-up window opens. Enter a name for the cohort and click Run. A message displays at the top of the page stating that the cohort has been created.
See access the cohort again in the future, click the See Patient Groups link at the top of the page. The Manage Cohorts page opens, where you can search for, add, or edit cohorts. Note that Organization (IRMS) and Facility Client users can only access patient groups they create and are within their Organization (IRMS) and Facility. Registry Client users have access to all patient groups.
After entering search criteria and clicking Search to retrieve a list of matching cohorts, click the arrow button in the Select column of a cohort in the list to view the details of that cohort. The Cohort View page opens with the criteria information. From this page, you can:
- Save as Recall Attempt - Select this option to save it as a recall attempt.
- Inactivate - Click this button to inactivate the cohort so that it cannot be used for reminder/recall notifications in the future.
- Run Reminder/Recall - Click this button to return to the Reminder/Recall's patient list page (Step 2). If you make any changes to the cohort here, the patient group will need to be saved as a new cohort. Patient list changes are not updated in the existing saved group. For example, if you decide to remove patients who do not have an available phone number from a saved cohort, you must save this change as a new cohort. It is highly recommended that a new name be used to differentiate it from the original cohort.
Send Email
This action generates a reminder/recall email for each patient on the patient list.
To begin, click the Send Email icon. A pop-up window opens with two tabs Message (default) and Instructions. On the Message tab, you can select whether to use the default message or create a new message. You can also select which language to use (English, Spanish, or Patient Preferred).
These are the fields available on the Message tab:
| Field | Description |
|
Facility Return Address Information |
Enter the Facility's name, phone number, street address, and city, state and zip code information in the four textboxes. This information appears in each letter. |
|
(preview email message) |
Select Default or User Defined from the drop-down list. The default message is pre-defined and cannot be edited. |
|
Output Language |
Select English, Spanish, or Patient Preferred from the drop-down list. If you select a language, you need to enter a user-defined message in that language in order for it to display properly in the notification. Language selection is tied to the language selected on the Patient Demographic page. Patients receive messages in the language selected if the language in their record is set to the same one. The system default message only displays in English. All other language outputs display in the user-defined message. The languages listed in the drop-down list are configured in the Language Type Define Lookup. |
|
(message textbox) |
If User Defined was selected for the email message, enter the message in the textbox. |
After entering the message information, you can:
- Make this count toward the number of recall attempts - Select this option if you want the reminder/recall notification generated here to count toward their total number of reminder/recall attempts.
- Save as Template - Click this button to save the reminder/recall parameters set on the first page of this session, the patient list, and the action selection as a template that can be used again.
- Run - Click this button to review the list of patients who will receive emails from the reminder/recall patient list. The list opens in a new browser tab or window; only the patients with email addresses listed are sent emails. Scroll down to the bottom of the page and click Send Emails to send the emails. Custom messages are saved to the user's account, so that a previously entered message auto-populates in the message textbox the next time the user uses Reminder/Recall.
To close the pop-up window, click the X in the upper right-hand corner.
|
|
 |